$ curl -fsSL https://raw.githubusercontent.com/platformio/platformio-core/develop/platformio/assets/system/99-platformio-udev.rules | sudo tee /etc/udev/rules.d/99-platformio-udev.rules
ここでいったん Windows ごと再起動します。
USB 機器のバインド
Windows 起動後、先に Ubuntu の usbipd を起動するために、WSL2 Ubuntu 窓を上げておきます。
次に Windows の PowerShell 窓を「管理者で起動」し、使いたい USB 機器を usbipdにアタッチします。
usbipd wsl list コマンドで USB 機器を表示。
> usbipd wsl list
BUSID  VID:PID    DEVICE                                                        STATE
3-1    17ef:6047  Lenovo USB Interface Device(HID), USB 入力デバイス            Not attached
3-3    0e8d:0608  RZ608 Bluetooth(R) Adapter                                    Not attached
7-1    0499:170d  AG06/AG03, Line (AG06/AG03)                                   Not attached
9-1    10c4:ea60  CP2104 USB to UART Bridge Controller                          Not attached
CP2104 USB to UART が M5Stack なので 9-1 をアタッチ。なお、初回のアタッチの操作のみ管理者権限が必要で次回からはユーザ権限でいけるようです。
> usbipd wsl attach --busid 9-1
うまくいけば、upsipd wsl list コマンドのデバイス部分が Ubuntu になります。
> usbipd wsl list
BUSID  VID:PID    DEVICE                                                        STATE
9-1    10c4:ea60  CP2104 USB to UART Bridge Controller                          Attached - Ubuntu-22.04
できたら、WSL2 Ubuntu で lsusb してみて機器(CP210)が見えればOKです。
$ lsusb
Bus 002 Device 001: ID 1d6b:0003 Linux Foundation 3.0 root hub
Bus 001 Device 004: ID 10c4:ea60 Silicon Labs CP210x UART Bridge
Bus 001 Device 001: ID 1d6b:0002 Linux Foundation 2.0 root hub
> usbipd wsl list
BUSID  VID:PID    DEVICE                                                        STATE
3-1    17ef:6047  Lenovo USB Interface Device(HID), USB 入力デバイス            Not attached
3-3    0e8d:0608  RZ608 Bluetooth(R) Adapter                                    Not attached
7-1    0499:170d  AG06/AG03, Line (AG06/AG03)                                   Not attached
9-1    28e9:0189                                                                Not attached
先に管理者権限 PowerShell でアタッチした後、リセットするとアタッチが切れるので、再アタッチ。 WSL2 Ubuntu 側からも Windows の usbipd.exe を呼べるのでビルド、アップロードとセットでコマンドを実行すると便利。
$ usbipd.exe wsl attach --busid 9-1
$ lsusb
Bus 002 Device 001: ID 1d6b:0003 Linux Foundation 3.0 root hub
Bus 001 Device 004: ID 28e9:0189 GDMicroelectronics GD32 DFU Bootloader (Longan Nano)
Bus 001 Device 001: ID 1d6b:0002 Linux Foundation 2.0 root hub
$ openocd -f board/esp32c3-builtin.cfg
Open On-Chip Debugger  v0.11.0-esp32-20220706 (2022-07-06-15:48)
Licensed under GNU GPL v2
For bug reports, read
        http://openocd.org/doc/doxygen/bugs.html
Info : only one transport option; autoselect 'jtag'
Info : esp_usb_jtag: VID set to 0x303a and PID to 0x1001
Info : esp_usb_jtag: capabilities descriptor set to 0x2000
Warn : Transport "jtag" was already selected
Info : Listening on port 6666 for tcl connections
Info : Listening on port 4444 for telnet connections
Info : esp_usb_jtag: serial (34:B4:72:12:94:14)
Info : esp_usb_jtag: Device found. Base speed 40000KHz, div range 1 to 255
Info : clock speed 40000 kHz
Info : JTAG tap: esp32c3.cpu tap/device found: 0x00005c25 (mfg: 0x612 (Espressif Systems), part: 0x0005, ver: 0x0)
Info : datacount=2 progbufsize=16
Info : Examined RISC-V core; found 1 harts
Info :  hart 0: XLEN=32, misa=0x40101104
Info : starting gdb server for esp32c3 on 3333
Info : Listening on port 3333 for gdb connections
Byte buffers do not store data as separate items. All data is stored as a sequence of bytes, and any number of bytes can be sent or retrieved each time. Use byte buffers when separate items do not need to be maintained (e.g. a byte stream).
if [[ -z "$ZELLIJ" ]]; then
    if [[ "$ZELLIJ_AUTO_ATTACH" == "true" ]]; then
        zellij attach -c
    else
        zellij
    fi

    if [[ "$ZELLIJ_AUTO_EXIT" == "true" ]]; then
        exit
    fi
fi
電源の USB-C の上にある BOOT ボタンを押しながら、USB-C を PC の USB-C に接続すれば認識されるはずです。
自分は PC に Ubuntu/ThinkPad を使っているので dmesglsusb は次のようになります。
$ sudo dmesg | tail -5
[ 2827.718195] usb 6-1: new high-speed USB device number 4 using xhci_hcd
[ 2827.882776] usb 6-1: New USB device found, idVendor=2345, idProduct=7654, bcdDevice= 2.23
[ 2827.882787] usb 6-1: New USB device strings: Mfr=1, Product=2, SerialNumber=0
[ 2827.882791] usb 6-1: Product: USB download gadget
[ 2827.882794] usb 6-1: Manufacturer: T-HEAD
$ lsusb | grep 2345
Bus 006 Device 004: ID 2345:7654 T-HEAD USB download gadget
Windows の方は先程のダウンロード先にドライバーがあります。(WSL2 + usbipd でもいいかもしれません)
認識できたらアーカイブ内の burn_gnome_gpu.sh を実行すれば OK です。fastboot コマンドは Linux バイナリで、burn_gnome_gpu.sh もシェルスクリプトなので、Windows の方もやはり WSL2 でやったほうが簡単かもしれません。ドライバーも入れる必要がありません(認識のさせ方を記事の最後の「関連」に記載しておきます)
$ sudo apt install pkg-config libfontconfig-dev
$ time cargo install --target-dir /mnt/ssd/home/sipeed/tmp alacritty
...(snip)..
   Installed package `alacritty v0.12.0` (executable `alacritty`)
real    16m22.428s
user    60m41.044s
sys     1m26.451s
起動ですが(予想はしていましたが)恐らく GPU ドライバーが未完成のため真っ黒画面でした。コマンドを打つとカーソルは動いているのが見えるので動作はしていそうです。(スクリーンショット右下で CPU が MAX になっているのは偶然です)
Zellij
ターミナルマルチプレクサ・ワークスペースである Zellij のビルド。こちらも Rust 製。
$ time cargo install --target-dir /mnt/ssd/home/sipeed/tmp zellij
real    51m20.308s
user    127m50.878s
sys     2m56.126s
$ zellij
Error occurred in server:

  × Thread 'async-std/runtime' panicked.
  ├─ At /home/sipeed/.cargo/registry/src/github.com-1ecc6299db9ec823/wasmer-compiler-cranelift-2.3.0/src/config.rs:73:45
  ╰─ construct Cranelift ISA for triple: Unsupported
$ wasmer –cranelift # amd64 official build real 0m23.464s $ wasmer run –cranelift # rv64 offcial build: real 3m8.754s $ wasmer run –llvm: # rv64 self build real 4m56.417s $ wasmtime real 2m49.691s pic.twitter.com/C2VONwLXCF
The image for the LicheePi 4A is updated irregularly. The initial image may not be stable, or it may not be able to fully utilize the performance of the TH1520. Please follow the steps below to get the latest image.
I can use OpenCL now, but sadly it segfaults as soon as I enqueue my kernel. The callstack is of little use. Is there any way that I can get the debug symbols for libPVROCL.so perhaps?
$ sudo systemd-nspawn -D rootfs/
Spawning container rootfs on /home/hiromasa/devel/riscv/lip4a/revyos-build/create/rootfs.
Press ^] three times within 1s to kill container.
root@rootfs:~#
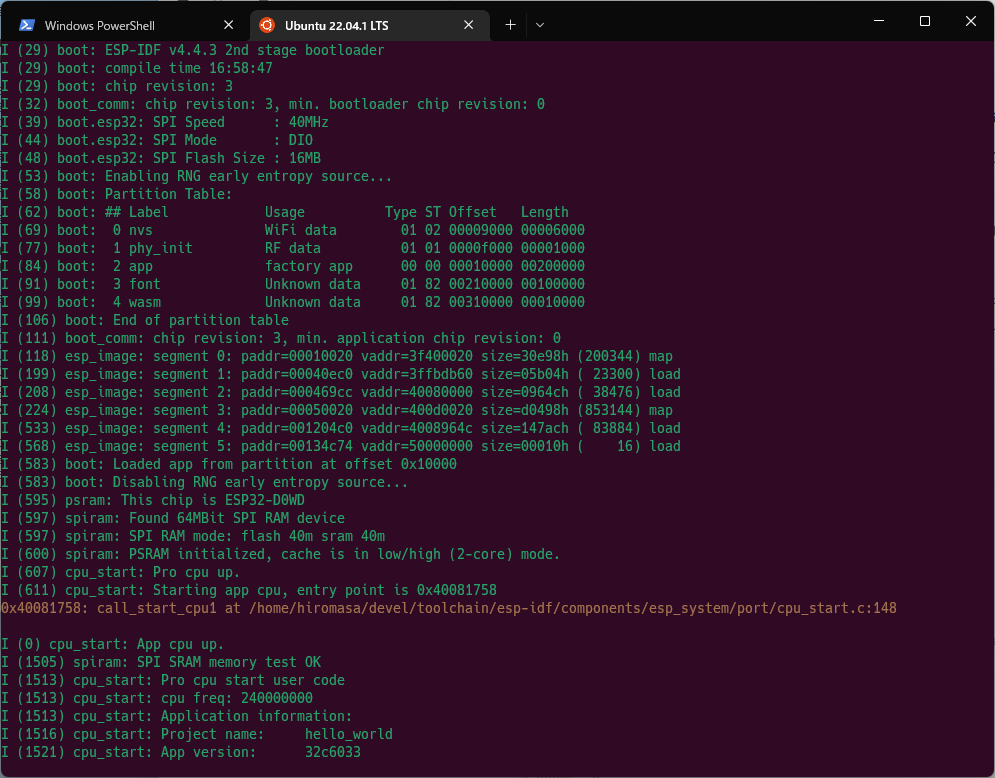
# neofetch
OS: Ubuntu 22.04.2 on Windows 10 riscv64


 トラックの自動切換え -> “何もしない”


 $ # ステージングで緑
~ devel amd64 mame master
$ # ステージングで緑
~ devel amd64 mame master  $ # コミット済み & 未push で上矢印
~ devel amd64 mame master
$ # コミット済み & 未push で上矢印
~ devel amd64 mame master 


 At /home/sipeed/.cargo/registry/src/github.com-1ecc6299db9ec823/wasmer-compiler-cranelift-2.3.0/src/config.rs:73:45
╰─
At /home/sipeed/.cargo/registry/src/github.com-1ecc6299db9ec823/wasmer-compiler-cranelift-2.3.0/src/config.rs:73:45
╰─
 (@h1romas4)