Advanced PHP IntelliSense for Visual Studio Code. In opposite to the included PHP IntelliSense and other PHP extensions, this uses an AST to parse the source code instead of relying on naive regular expression parsing.
Advanced PHP IntelliSense for Visual Studio Code.
In opposite to the included PHP IntelliSense and other PHP extensions, this uses an AST to parse the source code
instead of relying on naive regular expression parsing.
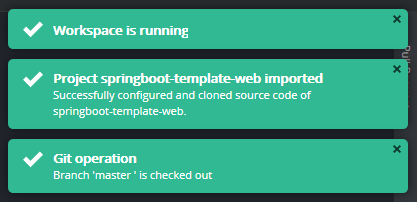
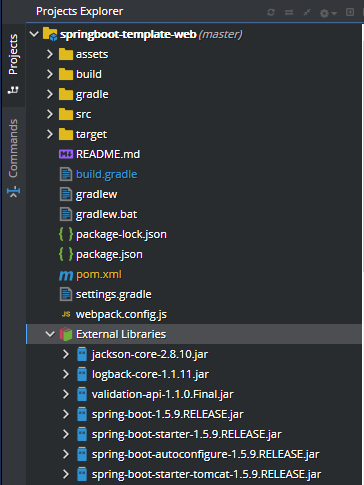
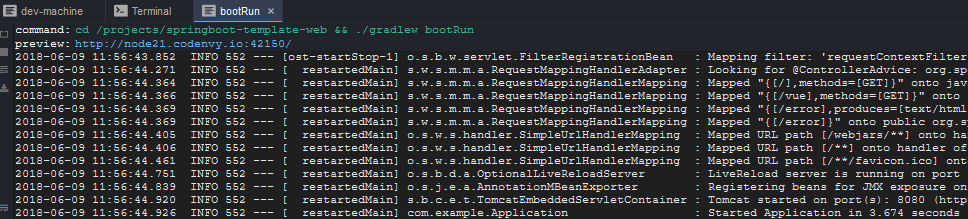
サンプルプロジェクトにある build.gradle を元に Java アプリケーションをビルドします。サンプルは Spring Boot を用いたウェブアプリケーションとなっていますが、必要となるライブラリ jar をインターネットから自動的にダウンロードし、アプリケーションが実行可能なように構成します。
./gradlew eclipse
VS Code の記事なのに eclipse と指定されていて不思議な感じですが、実は vscode-java(Language Support for Java(TM) by Red Hat) の実体は Eclipse の JDT と buildship という機能を language-server として外に出し、VS Code から使えるようにしたものです。
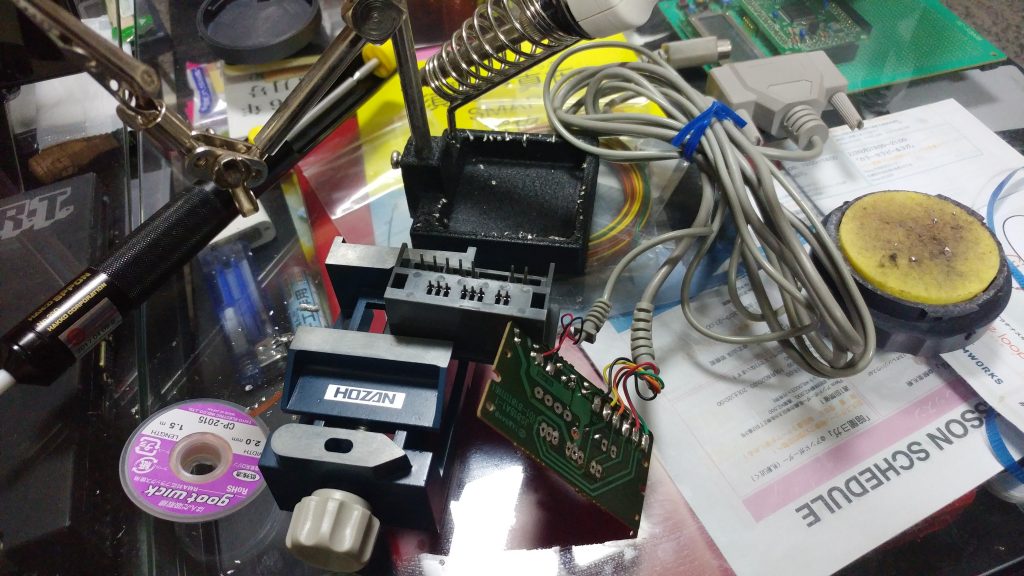
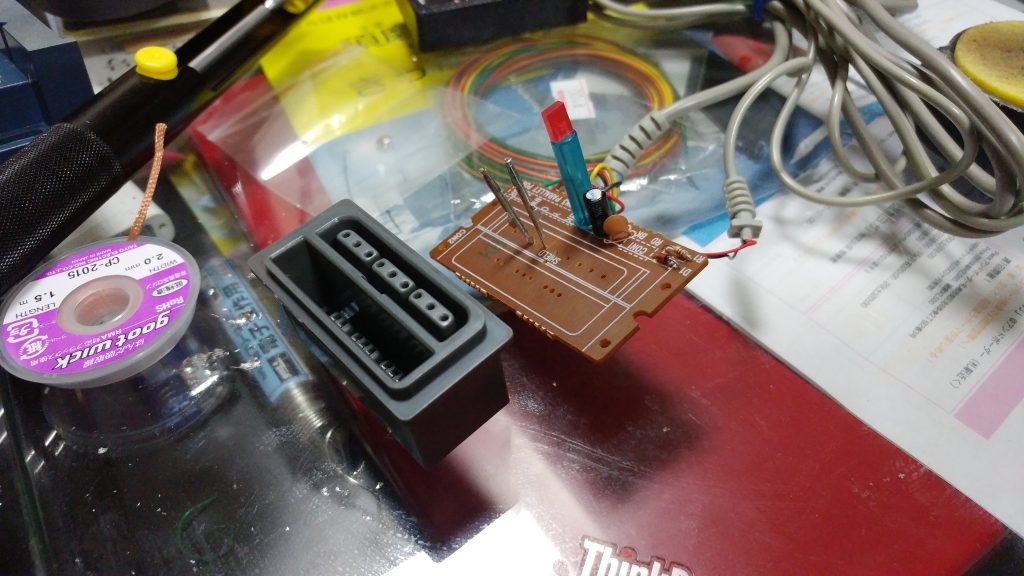
Arduino MEGA のシールドにマトリクス LED と MAX7219 をそれぞれ 2つ実装してみました。(狭いので半田付けが結構厳しかったです…)
出来上がったシールドの活用として、Arduino の ATmega16u2 側のファームを Midi Firmware for Arduino Uno (Moco) で書き換え MIDI USB デバイスにし、プログラムをかいて MIDI IN をひろって 8×8 LED でパターン表示できるようにしています。
Windows 版の dfu-programmer で Arduino UNO の ATmega16U2 に書き込む方法をいつも忘れて調べてしまうので、メモです。
Arduino UNO などについている ATmega16U2 にカスタムファームを書き込んであげることで、Arduino を USB-MIDI や HID デバイスにすることができます。
Windows から書き込むには、dfu-programer の Windows 版ダウンロードしてを使うと簡単です。
dfu-programmer
dfu-programmer is a multi-platform command-line programmer for Atmel (8051, AVR, XMEGA & AVR32) chips with a USB bootloader supporting ISP. Most Atmel devices having a USB port come pre-programmed with the bootloader, and this is a lightweight alternative to Atmel’s own FLIP/BatchISP program. This is a mostly Device Firmware Update (DFU) 1.0 compliant user-space application.
You can download the source distribution from the project files page. Windows users can download a pre-compiled executable, a set of USB drivers and the HTML help file in a separate zip file from the same page.
project files にコンパイル済みの dfu-programer.exe と USB デバイスドライバが同梱されたアーカイブファイルがあるので展開しておきます。
次に Arduino の次のジャンパーをショートさせたまま USB で PC に接続し、Arduino の電源ランプが点灯したらショートを解除します。(本来はドライバーなどでなくジャンパピンを使いましょう。。
ショートを解除すると Windows がデバイスドライバを検索しにいきますので、先ほど展開したアーカイブに同梱されている atmel_usb_dfu.inf を指定してあげると次のように ATmega16U2 がデバイスとして認識されます。
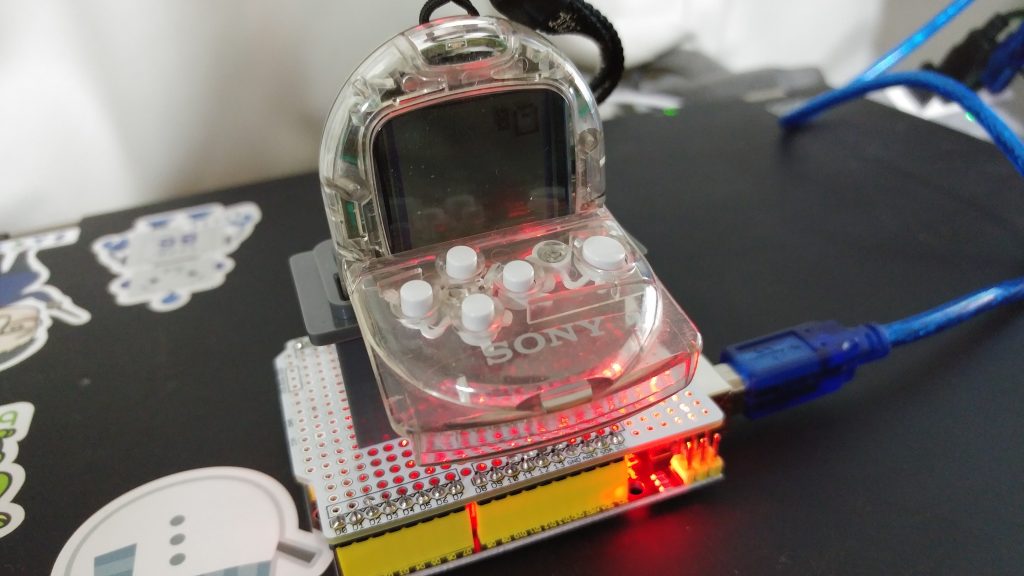
Looking at the Memory Card:
_________________
|_ _|_ _ _|_ _ _|
 1 2 3 4 5 6 7 8

1. DATA - Pin 12 on Arduino
2. CMND - Pin 11 on Arduino
3. 7.6V - External 7.6V power (only required for 3rd party cards and knockoffs)
4. GND - GND Pin on Arduino
5. 3.6V - 5V pin with a voltage divider to 3.6V
6. ATT - Pin 10 on Arduino
7. CLK - Pin 13 on Arduino
8. ACK - Pin 2 on Arduino
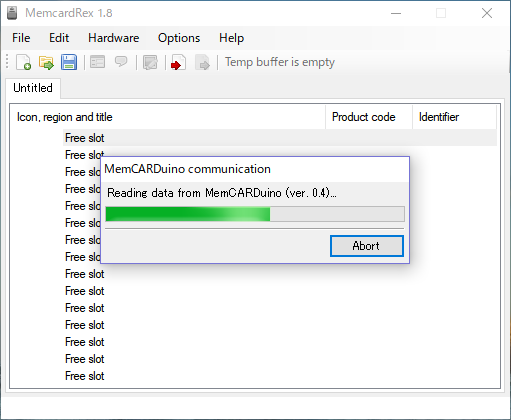
MemcardRex は Windows 用 C#.NET のデスクトップクライアントですので、他の OS をお使いの方は MemCARDuino に付属の Python2 スクリプトを使うと良いと思います。( Linux で動作することを確認しました。機械の動作がおかしい場合のデバッグにも使えます)
ポケステの CPU は ARM7 だということで、本家 ARM さんのページから GNU Arm Toolchain をダウンロードします。 今回は Windows を使っていたので、 gcc-arm-none-eabi-7-2017-q4-major-win32.zip をダウンロードして展開します。
The GNU Embedded Toolchain for Arm is a ready-to-use, open source suite of tools for C, C++ and Assembly programming targeting Arm Cortex-M and Cortex-R family of processors.
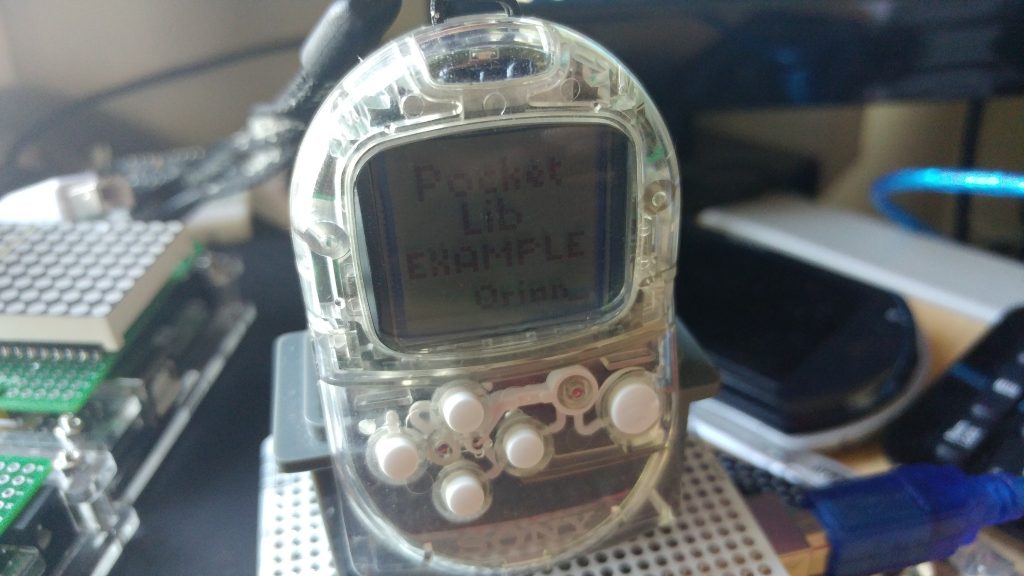
This is my complete devkit for the PocketStation, I used it to make PKBIOSTool and the NyanCat.
Full source and tools included !
Please give credits if you use it ! and drop me a mail if you make PocketStation stuff
psdevkit.zip を展開すると tools と Example がありますので、この手順では Example の中のプログラムをコンパイルして動作させてみたいと思います。
psdevkit Example のコンパイル
Example のコンパイルでは make コマンドを使っていますので、OS に導入されていない場合はインストールします。今回は Windows を使いましたので Windows 10 の bash on Windows(WLS)上の Ubuntu の make を使いました。(Cygwin でも良いと思います)
bash を起動し、試しに make と入力し “コマンドが見つかりません” なら表示された apt の手順で導入します。
次に、Makefile から呼び出される GNU Arm Toolchain の arm-none-eabi-gcc.exe などが入っている bin ディレクトリと、psdevkit 同梱の tools の mcpad.exe への PATH を bash に次のような感じで設定します。(相対パスで指定した例)
デフォルトが 3.3V/8Mhz になるようですので要注意です。 この指定でもすんなり書き込めてしまうようですが、どんなプログラムを実行しても不明な USB デバイスになってしまう悲しい機械になってしまいます。(ちょっとはまりました…
また、Pro Micro に USB HID になるプログラムを書き込み、実行が始まると USB HID と COM ポートが OS に認識されますが、この際に COM ポートが書き込み時のものと異なるポートに配置され、次回のプログラム書き込みができなくなるケースがあるようです。 Windows であればデバイスマネージャから、どのように認識されたかを確認して、書き込みできない場合は COM ポートの設定を合わせてみてください。
特殊な操作として、起動中の Pro Micro の RST 端子を GND にちょいちょいと 2回落とすとリセットがかかり初期状態の COM ポートが 8秒間だけ現れる機能があります。
どうしても書き込みができなくなった場合は、コンパイルから書き込みに入ったあたりでリセットをかけ、出現した COM ポートめがけて Lチカなどを転送すると元に戻ってほっとします。
てなわけで若干癖があるボードですが、無事セガサターンのバーチャスティックを USB 化することができました。
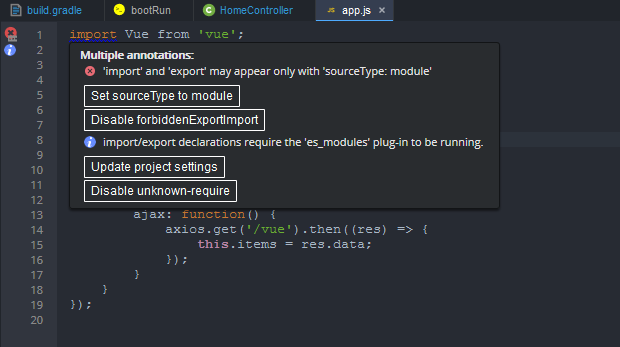
maven プラグインを追加。(と maven プラグインが要求するため groud, version を追加)
plugins {
    id 'java'
    id 'eclipse'
    id 'maven'
    id 'com.moowork.node' version '1.2.0'
    id 'org.springframework.boot' version '1.5.9.RELEASE'
}

group = 'com.example'
version = '1.0-SNAPSHOT'
次に、dependencies に使うバージョンを追記します。(Gradle の Spring Boot プラグインは指定したプラグインのバージョンから、依存関係のライブラリバージョンも自動で認識してくれますが、Maven プラグインからは参照できないため)
dependencies {
    compile('org.springframework.boot:spring-boot-starter-web:1.5.9.RELEASE')
    compile('org.thymeleaf:thymeleaf-spring4:3.0.2.RELEASE')
    compile("org.springframework.boot:spring-boot-devtools:1.5.9.RELEASE")
}

task createPom {
    description "Generates a pom.xml in the project root directory; useful e.g. for IDEs which can read POM but don't directly support Gradle."
    doLast {
        pom {
        }.writeTo("pom.xml")
    }
}

compileJava.dependsOn createPom
Rocket – A Rust game running on WASM Technically, this isn’t necessary in the case of Javascript, since there will only be one thread. Still, the type system knows nothing about that… Hence the mutex.
Alacritty is the fastest terminal emulator in existence. Using the GPU forrendering enables optimizations that simply aren’t possible in other emulators.Alacritty currently supports macOS and Linux, and Windows.
font:
  # Normal (roman) font face
  normal:
    family: Ricty Diminished Discord for Powerline
    # The `style` can be specified to pick a specific face.
    # style: Regular
ということで起動してみると、、
フォントずれも発生せず日本語環境でもいい感じに動作しました!
IM による漢字入力についてはまだインライン入力ができないようですが、カーソル位置の適切な場所に吹き出し形式でインサートすることができますので、大量に日本語を入力しない限り違和感はないと感じました。
Hey there maintainers! I’ve been working for the last several months on supporting OpenType fonts, which really just means supporting the CFF font table.
WSL から Windows のツールチェインに変更してもどうにも Linux と比較してコンパイルが遅いので、さくさく開発を求める方は生か仮想の Linux 上で作業するといいかもです。なお、現在開発版(v3.2)の esp-idf にはプレビューとして CMake ベースのWindows のツールチェインが提供されており、将来的にネイティブの cmake/gcc 構成になるようなのでコンパイル速度は恐らく今後改善されるのではないかと思います。
本記事では以下の文書を参考に make 時に -j4 オプションをつけて CPU コアを活用してコンパイル時間を改善した手順となっています。(8コアの方は -j8 にしてください) Windows Defender をお使いの場合、プロジェクトフォルダを監視から外すのも有効なようです。
$ make -j4 flash monitor
# フラッシュ後起動すれば OK!
Flashing binaries to serial port COM3 (app at offset 0x10000 )...
esptool.py v2.6
Serial port COM3
Connecting....
Chip is ESP32D0WDQ6 (revision 1)
なお、起動後のシリアルモニターは ctrl + ] で停止することができます。
VS Code によるソースの編集とコンパイル
ここまでの手順でコンパイルとフラッシュができるようになりましたので、これを Visual Studio Code でソースの編集とともにできるようにします。
VS Code インストール後、拡張機能「ms-vscode.cpptools」を導入します。
次に編集したいプロジェクトを VS Code で開きます。(ここでは先ほどつくった C:\develop\esp\msys32\home\[ユーザ名]\esp\hello_m5stack フォルダを開いています)
さて、便宜上プロジェクトフォルダーを mingw32 配下(C:\develop\esp\msys32\home\[ユーザー名]\esp)において作業を進めましたが、設定完了後は Windows 上の任意の位置に配置できますのでお好みの場所に移したりコピーしたりしてください。(なお、フォルダーを移した場合はいったん make clean した後 make してください)
ちなみに Arduino 向けの LTC6904 ライブラリーを書いている方の ソースコード を見ていたところ次のようなコメントアウトを発見。いったん完全に電源を落としてから 100ms 待つというのが NECESSARY TO USE となっているので、もしかするとちょっと癖があるのかもしれません。
// NECESSARY TO USE
//#define pwrpin PORTC2
//#define gndpin PORTC3
//DDRC |= _BV(pwrpin) | _BV(gndpin);
//PORTC &=~ _BV(gndpin);
//PORTC |=  _BV(pwrpin);
//delay(100); // wait for things to stabilize
//Wire.begin();